![[images/file_one.gif]](file_one.gif)
![[coding.jpg]](coding.jpg) This tutorial
assumes a few things. One, that you own and have installed a modern C/C++
compiler; I use Borland C++ 5.01 but I'm compiling as C code so a straight C
compiler should work. Two, that you have a basic understanding of the C/C++
language; you know what a typedef is, what #includes are and how they work, how
to use pointers, arrays, etc.... These are things I will not cover. You will
also have to understand while, and for loops and switch and if statements. You
should be able to get by with limited knowledge as long as you look stuff up
that you don't understand, but it be much more of a challenge if you are
stumbling over language elements when trying to accomplish some windows task.
This tutorial
assumes a few things. One, that you own and have installed a modern C/C++
compiler; I use Borland C++ 5.01 but I'm compiling as C code so a straight C
compiler should work. Two, that you have a basic understanding of the C/C++
language; you know what a typedef is, what #includes are and how they work, how
to use pointers, arrays, etc.... These are things I will not cover. You will
also have to understand while, and for loops and switch and if statements. You
should be able to get by with limited knowledge as long as you look stuff up
that you don't understand, but it be much more of a challenge if you are
stumbling over language elements when trying to accomplish some windows task.
I will format the code to my own style, probably making small changes for clearity. Also the code will be(when possible) adjusted to fit on a standard dos or terminal screen that is 80 characters wide.
I've added complete examples as zip files to most sections. These may not be identical to the ones presented in the document but they'll be pretty close.
#include <windows.h>

int WINAPI WinMain(HINSTANCE hInstance, HINSTANCE hPrevInstance,
   LPSTR lpCmdLine, int nCmdShow)
{
   MessageBox(NULL, "Goodbye, cruel world!", "Note", MB_OK | MB_SYSTEMMODAL);
   return 0;
}
If that doesn't work, your first step is to read whatever errors you get and if you don't understand them, look them up in the help or whatever documents accompany your compiler. Make sure you have specified a Win32 GUI(not console) project/makefile/target whatever applies to your compiler. Unfortunately I can't help much with this part either, as errors and how to fix them vary from compiler to compiler (and person to person).
You'll probably get some warnings about you not using the parameters supplied
to WinMain(). This is OK. Now that we've established you can in
fact compile a program, lets go through that little bit of code....
int WINAPI WinMain(HINSTANCE hInstance, HINSTANCE hPrevInstance,
   LPSTR lpCmdLine, int nCmdShow)
WinMain() is windows equivalent of main() from
DOS or UNIX. This is where your program starts execution. The parameters are as
follows:
HINSTANCE hInstance
HINSTANCE hPrevInstance
NULL for Win32 programs.
LPSTR lpCmdLine
(LPSTR == char*)
int nCmdShow
ShowWindow(). We'll
get to his later. As of this writing hInstance is always the same with a value of
0x00400000. This fact should not be used in regular programming as
this will make portability and possible future changes to break your code. This
value is used for things like loading resources and any other task which is
performed on a per-module basis.
hPrevInstance used to be the handle to the previously run
instance of your program (if any) in Win16. This no longer applies.
WINAPI specifies the calling convention and is currently defined
as _stdcall. You will find that many of the normal keywords or
types have windows specific definitions, UINT for unsigned
int, LPSTR for char* etc... This is
theoretically intended to improve portability (across windows platforms that
is). Which you choose is really up to you. If you are more comfortable using
char* instead of LPSTR, feel free to do so. The only time it really
becomes an issue is when writing code to compile on more than one windows
platform, (Win16, Win95/98, NT+UNICODE, etc...)
Download simple_window.zip
I always liked to do things first and learn them later...so here is the code to a simple window which will be explained shortly.
#include <windows.h>

static char g_szClassName[] = "MyWindowClass";
static HINSTANCE g_hInst = NULL;

LRESULT CALLBACK WndProc(HWND hwnd, UINT Message, WPARAM wParam, LPARAM lParam)
{
   switch(Message)
   {
      case WM_CLOSE:
         DestroyWindow(hwnd);
      break;
      case WM_DESTROY:
         PostQuitMessage(0);
      break;
      default:
         return DefWindowProc(hwnd, Message, wParam, lParam);
   }
   return 0;
}

int WINAPI WinMain(HINSTANCE hInstance, HINSTANCE hPrevInstance,
   LPSTR lpCmdLine, int nCmdShow)
{
   WNDCLASSEX WndClass;
   HWND hwnd;
   MSG Msg;

   g_hInst = hInstance;

   WndClass.cbSize        = sizeof(WNDCLASSEX);
   WndClass.style         = NULL;
   WndClass.lpfnWndProc   = WndProc;
   WndClass.cbClsExtra    = 0;
   WndClass.cbWndExtra    = 0;
   WndClass.hInstance     = g_hInst;
   WndClass.hIcon         = LoadIcon(NULL, IDI_APPLICATION);
   WndClass.hCursor       = LoadCursor(NULL, IDC_ARROW);
   WndClass.hbrBackground = (HBRUSH)(COLOR_WINDOW+1);
   WndClass.lpszMenuName  = NULL;
   WndClass.lpszClassName = g_szClassName;
   WndClass.hIconSm       = LoadIcon(NULL, IDI_APPLICATION);

   if(!RegisterClassEx(&WndClass))
   {
      MessageBox(0, "Window Registration Failed!", "Error!",
         MB_ICONEXCLAMATION | MB_OK | MB_SYSTEMMODAL);
      return 0;
   }

   hwnd = CreateWindowEx(
      WS_EX_CLIENTEDGE,
      g_szClassName,
      "The title of my window",
      WS_OVERLAPPEDWINDOW,
      CW_USEDEFAULT, CW_USEDEFAULT, 320, 240,
      NULL, NULL, g_hInst, NULL);

   if(hwnd == NULL)
   {
      MessageBox(0, "Window Creation Failed!", "Error!",
         MB_ICONEXCLAMATION | MB_OK | MB_SYSTEMMODAL);
      return 0;
   }

   ShowWindow(hwnd, nCmdShow);
   UpdateWindow(hwnd);

   while(GetMessage(&Msg, NULL, 0, 0))
   {
      TranslateMessage(&Msg);
      DispatchMessage(&Msg);
   }
   return Msg.wParam;
}
For most part this is the simplest windows program you can write that
actually creates a functional window, a mere 70 or so lines. If you got the
first example to compile then this one should work with no problems.
static char g_szClassName[] = "MyWindowClass";
static HINSTANCE g_hInst = NULL;
The first variable here stores the name of our window class we will use to register our window's class. This has NOTHING to do with C++ classes. A window class stores information about a window such as it's windows procedure which control the window, the small and large icons for the window, and the background color. Attributes like the icons and window colour can be changed later if wanted.
The second provides a storage spot for the hInstance parameter we get in WinMain().
LRESULT CALLBACK WndProc(HWND hwnd, UINT Message, WPARAM wParam, LPARAM lParam)This is our window procedure, it handles all of the messages that our window receives. LRESULT is simply a long. CALLBACK, like WINAPI, is defined as _stdcall.
Windows programs, unlike DOS programs, are event or message driven. This means that in general they sit idle and do nothing untill they receive a message, they act on the message, and then wait around for the next one. This is different than DOS coding in that DOS programs actively try and get input form the user, by functions such as gets(), getch(), etc... When a windows program responds to a message this is called handling the message and can be as simple as returning zero, or as involved as anything you can imagine.
Due to the message-handling functionality of windows it is rare that you will ever call a function to get input from the user. Nearly everything that needs doing can be done by handling the appropriate message and using the information it provides.
When a message is sent to out window, it calls our windows procedure and by checking the value of the Message parameter we can see which message it was. The wParam and lParam parameters are used differently by each message to provide additional information relating to the message.
For now, since our program doesn't do anything, all we need to handle are WM_CLOSE and WM_DESTROY to allow our program to be closed. Otherwise clicking on the [x] button on the window would have no effect and the user would need to hit Ctrl+Alt+Del to terminate the program.
When the user tries to close our window we get a WM_CLOSE message. We can do anything we want to here, but unless you want to really confuse people it is best to stick to standard behaviour. This means either terminating the program right away or poping up a message box to ask the user if they want to save their work first (if saving applies to the program).
I usually take two step to closing my program, one is in WM_CLOSE to do things like prompt the user to save, and once that is done call DestroyWindow() which sends a WM_DESTRORY to our main window and then removes it from the system. WM_DESTROY is where I do thing like free resources, close files, etc... and then PostQuitMessage(). After calling PostQuitMessage you will receive no more messages and your program will terminate with the value passed to the call. PostQuitMessage() is essentially the last thing you do in your program.
Now if we had to handle all of the messages necessary to run a usefull window that would be a monumental, not to mention redundant, task indeed. Instead there is a DefWindowProc to which we can pass any message we don't want or need to handle. This simplifies things considerably by providing default behaviour and reponses to many of windows' hoard of messages.
Next we see in WinMain that we register our window class. We fill out the members of a WNDCLASSEX structure and call RegisterClassEx(). The members of the struct affect the window class as follows:
cbSize
style
lpfnWndProc
cbClsExtra
cbWndExtra
hInstance
hIcon
hCursor
hbrBackground
lpszMenuName
lpszClassName
hIconSm
We then call RegisterClassEx() and check for failure, if it fails we pop up a message which says so and abort the program by returning from the WinMain() function.
Once the class is registered, we can create a window with it. You should look up the paramters for CreateWindowEx, but I'll explain them breifly here.
The first parameter (WS_EX_CLIENTEDGE) is the extended windows style, in this case I have set it to give it a sunken inner border around the window. Set it to NULL if you'd like to see the difference. Also play with other values to see what they do.
Next (g_szClassName) we have the class name, this is a string which must match the one we used to register our class. After that we specify our Window name which is the name that will be displayed in the caption, or title bar on out window.
The parameter we have as WS_OVERLAPPEDWINDOW is the window style parameter. There are quite a few of these and you should look them up and experiment to find out what they do. These will be covered more later.
The next four parameters (CW_USEDEFAULT, CW_USEDEFAULT, 320, 240) are the X and Y co-ordinates for the top left corner of your window, and the width and height. I've set the X and Y values to CW_USEDEFAULT to let windows choose where on the screen to put the window. Remeber that the left of the screen is an X value of 0 and it increases to the right; The top of the screen is a Y value of zero which increases towards the bottom. The units are pixels, which is the smallest unit a screen can display at a given resolution.
Next (NULL, NULL, g_hInst, NULL) we have the parent window handle, the menu handle, the application instance handle, and a pointer to window creation data. The parent handle is NULL because we have no parent, this is our main(top-level) window. The menu is NULL for now since we don't have one yet. The instance handle is set to the global value we stored, and the creation data (which I almost never use) that can be used to send additional data to the window that is being created is also NULL.
Just what is NULL you ask? Well it is simply 0 (zero). I use NULL to denote a lack of value, for parameter I am not specifying, etc... whereas I use 0 to say I am specifying an actual valid value of 0. They are completely the same except for appearences. For example I would pass NULL to a function that should ignore the parameter, and I would pass 0 to a function for which an integer value (lets say, a co-ordinate) of zero is completely valid.
   ShowWindow(hwnd, nCmdShow);
   UpdateWindow(hwnd);

   while(GetMessage(&Msg, NULL, 0, 0))
   {
      TranslateMessage(&Msg);
      DispatchMessage(&Msg);
   }
   return Msg.wParam;
After we've created the window and checked to make
sure we have a valid handle we Show the window, using the last parameter in
WinMain and then Update it, to get it to redraw itself on screen.
This is the Big Moment!!! We now enter the [drumroll please] Message Loop!
ta daa.
This loop runs the whole show. GetMessage gets a message from your applications message queue, TranslateMessage does some additional processing on keyboard events like generating WM_CHAR messages to go along with WM_KEYDOWN messages. Finally DispatchMessage sends the message to our (or another) window procedure.
When you finally call PostQuitMessage() at the end of your program, the GetMessage functions returns 0 and the while loop terminates and we exit the program and return the value from the PostQuitMessage call which is contained in Msg.wParam.
Phew. Well that's it! If I haven't explained stuff clearly enough yet, just hang in there and hopefully things will become more clear as we get into more usefull programs.
Download window_click.zip
![[window_click.gif]](window_click.gif) Alright,
we've got a window, but it doesn't do anything except what DefWindowProc allows
it to, like be sized, maximised, etc... Not really all that exciting.
Alright,
we've got a window, but it doesn't do anything except what DefWindowProc allows
it to, like be sized, maximised, etc... Not really all that exciting.
In the next section I am going to show you how to modify what you already have to do somehting new. This way I can just tell you "Handle this message, and do this in it..." and you will know what I mean and be able to do so without seeing an entire example.
Okay for starters take the example code for the window above and make sure it compiles and runs as expected. Then you can either keep working on it for the next little bit or copy it to a new project to modify.
We're going to add the capability to show the user what the name of our program is when they click on our window. Not very exciting, it's basically to get the hang of handling messages. Lets look at what we have in our WndProc:
LRESULT CALLBACK WndProc(HWND hwnd, UINT Message, WPARAM wParam, LPARAM lParam)
{
   switch(Message)
   {
      case WM_CLOSE:
         DestroyWindow(hwnd);
      break;
      case WM_DESTROY:
         PostQuitMessage(0);
      break;
      default:
         return DefWindowProc(hwnd, Message, wParam, lParam);
   }
   return 0;
}
If we want to handle mouse clicks, we need to add a
WM_LBUTTONDOWN handler (or WM_RBUTTONDOWN, WM_MBUTTONDOWN, for right and middle
clicks respectivly).
If I or someone else refers to handling a message they mean to add it into your WinMain as follows.
LRESULT CALLBACK WndProc(HWND hwnd, UINT Message, WPARAM wParam, LPARAM lParam)
{
   switch(Message)
   {
      case WM_LBUTTONDOWN:    // <-
                              // <-     we added this stuff
      break;                  // <-
      case WM_CLOSE:
         DestroyWindow(hwnd);
      break;
      case WM_DESTROY:
         PostQuitMessage(0);
      break;
      default:
         return DefWindowProc(hwnd, Message, wParam, lParam);
   }
   return 0;
}
The order in which you handle your messages rarely
matters. Just make sure you've got your break; after each one. As you can see we
added another case: into our switch. Now we want something to happen when we get
to this part of our program.
First I will present the code we want to add (that will show the user the filename of our program) and then I will integrate it into our program. Later on I will probably just show you the code and let you integrate it into your program. This is of course better for me as I don't have to type as much and it's better for you because you will be able to add the code into ANY program and not just the ones I present.
char szFileName[MAX_PATH];

GetModuleFileName(hInstance, szFileName, MAX_PATH);
MessageBox(hWindow, szFileName, "This program is:", MB_OK | MB_ICONINFORMATION);
Now this code does not stand on it's own, it can't just be slapped into our code any old place. We specifically want it to run when the user clicks the mouse button so this is how I would merge this small bit of code into our skeleton program:
LRESULT CALLBACK WndProc(HWND hwnd, UINT Message, WPARAM wParam, LPARAM lParam)
{
   char szFileName[MAX_PATH]; //<- 1

   switch(Message)
   {
      case WM_LBUTTONDOWN:
         GetModuleFileName(g_hInst, szFileName, MAX_PATH);      // <- 2
         MessageBox(hwnd, szFileName, "This program is:",         // <- 3
            MB_OK | MB_ICONINFORMATION);
      break;
      case WM_CLOSE:
         DestroyWindow(hwnd);
      break;
      case WM_DESTROY:
         PostQuitMessage(0);
      break;
      default:
         return DefWindowProc(hwnd, Message, wParam, lParam);
   }
   return 0;
}
First, since we cant declare a variable in a switch
statement we put it at the top of the function.
Next look at the GetModuleFileName function. Notice the first parameter has changed to match the global variable we have already declared? A lot of the time code will simply substitute a made-up variable name in order to show what value you should put there. We have no hInstance variable, but we know to use our corresponding variable g_hInst.
Finally look at the MessageBox function. You'll see we've replaced hWindow, with hwnd, which is the local variable passed into the function as paramter number one that represents our window.
Now most of the time I will try to keep my own code consistent and you shouldn't need to make some of these changes, but you need to know how.
So if you've added in that code, compile it now. If it works, click on the window and you should see a box with the name of the .exe pop up.
If it doesn't work, here's the full code to the program. Compare it to what you have and see what, if any, mistakes you made.
#include <windows.h>

static char g_szClassName[] = "MyWindowClass";
static HINSTANCE g_hInst = NULL;

LRESULT CALLBACK WndProc(HWND hwnd, UINT Message, WPARAM wParam, LPARAM lParam)
{
   char szFileName[MAX_PATH];

   switch(Message)
   {
      case WM_LBUTTONDOWN:
         GetModuleFileName(g_hInst, szFileName, MAX_PATH);
         MessageBox(hwnd, szFileName, "This program is:",
            MB_OK | MB_ICONINFORMATION);
      break;
      case WM_CLOSE:
         DestroyWindow(hwnd);
      break;
      case WM_DESTROY:
         PostQuitMessage(0);
      break;
      default:
         return DefWindowProc(hwnd, Message, wParam, lParam);
   }
   return 0;
}


int WINAPI WinMain(HINSTANCE hInstance, HINSTANCE hPrevInstance,
   LPSTR lpCmdLine, int nCmdShow)
{
   WNDCLASSEX WndClass;
   HWND hwnd;
   MSG Msg;

   g_hInst = hInstance;

   WndClass.cbSize        = sizeof(WNDCLASSEX);
   WndClass.style         = NULL;
   WndClass.lpfnWndProc   = WndProc;
   WndClass.cbClsExtra    = 0;
   WndClass.cbWndExtra    = 0;
   WndClass.hInstance     = g_hInst;
   WndClass.hIcon         = LoadIcon(NULL, IDI_APPLICATION);
   WndClass.hCursor       = LoadCursor(NULL, IDC_ARROW);
   WndClass.hbrBackground = (HBRUSH)(COLOR_WINDOW+1);
   WndClass.lpszMenuName  = NULL;
   WndClass.lpszClassName = g_szClassName;
   WndClass.hIconSm       = LoadIcon(NULL, IDI_APPLICATION);

   if(!RegisterClassEx(&WndClass))
   {
      MessageBox(0, "Window Registration Failed!", "Error!",
         MB_ICONEXCLAMATION | MB_OK | MB_SYSTEMMODAL);
      return 0;
   }

   hwnd = CreateWindowEx(
      WS_EX_CLIENTEDGE,
      g_szClassName,
      "The title of my window",
      WS_OVERLAPPEDWINDOW,
      CW_USEDEFAULT, CW_USEDEFAULT, 320, 240,
      NULL, NULL, g_hInst, NULL);

   if(hwnd == NULL)
   {
      MessageBox(0, "Window Creation Failed!", "Error!",
         MB_ICONEXCLAMATION | MB_OK | MB_SYSTEMMODAL);
      return 0;
   }

   ShowWindow(hwnd, nCmdShow);
   UpdateWindow(hwnd);

   while(GetMessage(&Msg, NULL, 0, 0))
   {
      TranslateMessage(&Msg);
      DispatchMessage(&Msg);
   }
   return Msg.wParam;
}
Resources are pre-defined bits of data stored in binary format inside your executable file. You create resources in a resources script, a file with an extension of ".rc". comercial compilers will have a visual resource editor which allows you to create resources without manually editing this file but sometimes editing it is the only way to go, especially if your compiler has no visual editor (or it sucks). Conversly MS (as mentioned in the rant) makes it nearly impossible to NOT use the resource editor. Unless you know what you might have a lot of trouble trying to manually edit the .rc or .rh/.h file. You will need to use the visual resource editor. I appologize on MS's behalf.
Unfortunately different compiler suites handle resources differently. I will present the way I will be showing them and then point some things out that you might have trouble with.
NOTE TO USERS OF MSVC++: A
little while after begining this tutorial I aquired a copy of VC++. I can now
verify that, yes in fact my examples will build in VC++. You simple create an
empty Win32 workspace and add the files to it. My resources WILL work, but you
will need to #include <windows.h> at the
beginning of them. If you try and edit the .rc files in the visual resource
editor it will probably still work BUT it will create a
new file called "resource.h" which you will need to include instead of my
"whatever.rh". It will also alter the .rc file considerably. I personally take
great offence at software which makes unauthorised changes to my data, I will
continue to use BC++ in writing this document.
First lets take a very simple resource file, with a single icon.
MYICON ICON "my_icon.ico"That's the entire file. MYICON is the name of the resource, ICON is the type and "my_icon.ico" is teh name of the external file which contains it. This should work on any compiler. Now lets say we add a MENU resource:
#include "tut0.rh"

MYICON ICON "my_icon.ico"

MYMENU MENU
BEGIN
   POPUP "&File"
   BEGIN
      MENUITEM "E&xit", CM_FILE_EXIT
   END
END
Again MYMENU is the name of the resource and MENU is
the type. Now a fine point, see the BEGIN and END up there? Well my resource
editor uses { in place of BEGIN and } in place of END. If your compiler supports
both feel free to pick which one you use. If it only supports one or the other,
you will need to make the necessary replacements to get it to work.
You will see I added an #include at the top. This file will contain the ID's used for any menus or controls in the .rc file, CM_FILE_EXIT is such an ID. The .rh for each .rc you make must be included in each .c or .cpp file in which you want to use your resource ID's.
#define CM_FILE_EXIT 9001This is the entire .rh file. It contains only one ID CM_FILE_EXIT and it's value 9001. The value you pick doesn't matter, but it can't be the same as another control or menu because this will cause conflicts when your program runs. Also don't use values lower than 100 as some of these are already defined for various purposes.
Another point to note, some compilers may require you to #include <windows.h> in your .rc file in order to compile properly. Mine does not.
Now an example of how to use a resource in your program.
HICON hMyIcon = LoadIcon(g_hInst, "MYICON");The first parameter of LoadIcon and many other resource using functions is the handle to the current instance(read above sections for explaination). The second is the NAME of the resource.
Now there is an alternative way of doing things which give resources ID's instead of string names. I will show you the .rc and .rh files again but this time using ID's instead of names.
The .rh:
#define CM_FILE_EXIT 9001
#define IDI_MYICON 101
#define IDM_MYMENU 102
The .rc:
#include "tut0.rh"

IDI_MYICON ICON "my_icon.ico"

IDM_MYMENU MENU
BEGIN
   POPUP "&File"
   BEGIN
      MENUITEM "E&xit", CM_FILE_EXIT
   END
   END
END
Doesn't look all that different except that this
time we #defined the names of the resources, turning them into number
identifiers. Now when we load our icon this time we need to do soemthing
slightly different.
HICON hMyIcon = LoadIcon(g_hInst, MAKEINTRESOURCE(IDI_MYICON));MAKEINTRESOURCE() takes an integer ID and returns a value usable by functions which need a resource NAME.
Usually I will use names where possible, I find them less of a hassle. If however you choose to use ID's then go ahead, you simply need to make the few small changes mentioned here.
Understanding the message loop and entire message sending structure of windows programs is essential in order to write anything but the most trivial programs. I figured I'd better go over messages a little more here as I sort of just threw them in earlier and expected you to get it.
#define WM_INITDIALOG                   0x0110
#define WM_COMMAND                      0x0111

#define WM_LBUTTONDOWN                  0x0201
...and so on. Messages are used to communicate pretty much everything in windows at least on basic levels. If you want a window or control(which is just a specialized window) to do something you send it a message. If another window wants you to do something it sends you a message. If an event happens such as the user typing on the keyboard, moving the mouse, clicking a button, then messages are sent by the system to the windows affected. If you are one of those windows, you handle the message and act accordingly.
Each windows message may have up to two parameters, wParam and lParam. Originally wParam was 16 bit and lParam was 32 bit, but in Win32 they are both 32 bit. Not every message uses these parameters, and each message uses them differently. For example the WM_CLOSE message doesn't use either, and you should ignore them both. The WM_COMMAND message uses both, wParam contains two values, HIWORD(wParam) is the notification message (if applicable) and LOWORD(wParam) is the control or menu id that sent the message. lParam is the HWND (Window Handle) to the control which sent the message or NULL if the messages isn't form a control.
To send a message you can use PostMessage or
SendMessage. PostMessage puts the message into the Message Queue and returns immediatly. That means once
the call to PostMessage is done the message may or may not have been processed
yet. SendMessage sends the message directly to the window and doesn't return
untill the window has finished processing it. If we wanted to close a window we
could send it a WM_CLOSE message like this PostMessage(hwnd, WM_CLOSE, (WPARAM)NULL,
(LPARAM)NULL); which would have the same effect as clicking on the [x]
button on the top of the window. Notice that wParam and lParam are both NULL.
This is because, as mentioned, they aren't used for WM_CLOSE.
Lets say you were busy handling the WM_PAINT message and suddenly the user types a bunch of stuff on the keyboard. What should happen? Should you be interrupted in your drawing to handle the keys or should the keys just be discarded? Wrong! Obviously neither of these options is reasonable, so we have the message queue, when messages are posted they are added to the message queue and when you handle them they are removed. This ensure that you aren't going to miss messages, if you are handling one, the others will be queued up untill you get to them.
   while(GetMessage(&Msg, NULL, 0, 0))
   {
      TranslateMessage(&Msg);
      DispatchMessage(&Msg);
   }
The message loop Calls GetMessage, which looks in
your message queue. If the message queue is empty your program basically stops
and waits for one. Once a message arrives GetMessages returns. We take the
Messages (in the Msg variable) and pass it to TranslateMessage, this does a bit
of additional processing, translating virtual key messages into character
messages. Once that's done we pass the message to DispatchMessage. What
DispatchMessage does is take the message, gets which window it is for and then
looks up the Windows Procedure for the window. It then calls that procedure,
sending as parameters the handle of the window, the message, and wParam and
lParam. This is where you window procedure checks the message, and if it's one
it wants to handle does whatever it wants and then returns. And we're back to
waiting for another message in GetMessage!
I hope that helps, I probably haven't explained it as well as it needs to be explained but, oh well. To really get this stuff you just have to use it a lot.
Download menu_one.zip
Download
menu_two.zip
![[images/menu_one.gif]](menu_one.gif) This is just
a small section to show how to add basic menus to your window. Usually you use a
pre-made menu resource. This will be in an .rc file and will be compiled and
linked into your .exe. This is rather compiler specific, commercial compilers
will have a resource editor that you can use to create your menus, but for this
example I will show the text of the .rc file so you can add it in manually. I
usually have an .rh file as well which is included in both my .rc file and my .c
source files. This file contains the identifiers for controls and menu items
etc.
This is just
a small section to show how to add basic menus to your window. Usually you use a
pre-made menu resource. This will be in an .rc file and will be compiled and
linked into your .exe. This is rather compiler specific, commercial compilers
will have a resource editor that you can use to create your menus, but for this
example I will show the text of the .rc file so you can add it in manually. I
usually have an .rh file as well which is included in both my .rc file and my .c
source files. This file contains the identifiers for controls and menu items
etc.
For this example you can start with the window code from above ad add this code into it as instructed.
First the .rh file. You can call it whatever you want, mine is "tut0.rh".
#define CM_FILE_EXIT 9001
#define CM_STUFF_GO 9002
Not much there, but our menu will be pretty simple. The names and values here are up to you for the choosing. Now we write our .rc file.
#include <tut0.rh>

MYMENU MENU
BEGIN
   POPUP "&File"
   BEGIN
      MENUITEM "E&xit", CM_FILE_EXIT
   END
   POPUP "&Stuff"
   BEGIN
      MENUITEM "&Go", CM_STUFF_GO
      MENUITEM "G&o somewhere else", 0, GRAYED
   END
END
This is the structure of a menu resource. You can
probably figure out how to expand on it. It's even easier if you use a resource
editor but it's good to know how it's done anyway. Notice that one of the items
has an id of 0 and GRAYED after it. This is a way you can set up the structure
of your menu at first before fully implementing it. (Or just how to grey an
item) The menu resource's name in this case is "MYMENU".
You also want to #include <tut0.rh> in your source file (.c) so that the menu command identifiers will be defined.
The easiest way to attach the menu to your window is to specify it when you register the window class, like this:
WndClass.lpszMenuName = "MYMENU";Change that and see what happens. Your window should now have a File and Stuff menu with the respective items underneath. That is assuming your .rc file was properly compiled and linked into your program.
An alternative to using a menu resource is to create one on the fly(or when your program runs). This is a bit more work programming wise, but adds flexibility and is sometimes necessary.
Start again from our windows program above without the .rh or .rc added. Now we will handle the WM_CREATE message and add a menu to our window.
#define CM_FILE_EXIT 9001
#define CM_STUFF_GO 9002
Put these two id's at the top of your .c file this time, underneath your #includes. Next we add some variables to our WndProc:
HMENU hMenu, hSubMenu;And we add the following code into our WM_CREATE handler.
hMenu = CreateMenu();

hSubMenu = CreatePopupMenu();
AppendMenu(hSubMenu, MF_STRING, CM_FILE_EXIT, "E&xit");
AppendMenu(hMenu, MF_STRING | MF_POPUP, (UINT)hSubMenu, "&File");

hSubMenu = CreatePopupMenu();
AppendMenu(hSubMenu, MF_STRING, CM_STUFF_GO, "&Go");
AppendMenu(hMenu, MF_STRING | MF_POPUP, (UINT)hSubMenu, "&Stuff");

SetMenu(hwnd, hMenu);
This creates a menu alsmost the same as the one we had in the resource and attaches it to our window. A menu that is assigned to a window is automatically removed when the program terminates, so we don't need to worry about getting rid of it later. If we did though, we would use GetMenu and DestroyMenu.
Okay now that we have our menu, we need to make it do something. This is pretty simple, all we need to do is handle the WM_COMMAND message. Also we'll need to check which command we are getting and act accordingly. Now our WndProc should look something like this.
LRESULT CALLBACK WndProc(HWND hwnd, UINT Message, WPARAM wParam, LPARAM lParam)
{
   HMENU hMenu, hSubMenu;
   char szFileName[MAX_PATH]; //<- 1

   switch(Message)
   {
      case WM_COMMAND:
         switch(LOWORD(wParam))
         {
            case CM_FILE_EXIT:

            break;
            case CM_STUFF_GO:

            break;
         }
      break;
      case WM_CREATE:
         hMenu = CreateMenu();

         hSubMenu = CreatePopupMenu();
         AppendMenu(hSubMenu, MF_STRING, CM_FILE_EXIT, "E&xit");
         AppendMenu(hMenu, MF_STRING | MF_POPUP, (UINT)hSubMenu, "&File");

         hSubMenu = CreatePopupMenu();
         AppendMenu(hSubMenu, MF_STRING, CM_STUFF_GO, "&Go");
         AppendMenu(hMenu, MF_STRING | MF_POPUP, (UINT)hSubMenu, "&Stuff");

         SetMenu(hwnd, hMenu);
      break;
      case WM_LBUTTONDOWN:
         GetModuleFileName(g_hInst, szFileName, MAX_PATH);      // <- 2
         MessageBox(hwnd, szFileName, "This program is:",         // <- 3
            MB_OK | MB_ICONINFORMATION);
      break;
      case WM_CLOSE:
         DestroyWindow(hwnd);
      break;
      case WM_DESTROY:
         PostQuitMessage(0);
      break;
      default:
         return DefWindowProc(hwnd, Message, wParam, lParam);
   }
   return 0;
}
As you can see we've got our WM_COMMAND all set up,
and it even has another switch in it. This switch's on the value of the low word
of wParam, which in the case of WM_COMMAND contains the control or menu id that
sent the message.
We obviously want the Exit menu item to close the program. So in the WM_COMMAND, CM_FILE_EXIT handler you can use the following code to do just that.
PostMessage(hwnd, WM_CLOSE, 0, 0);That's it! All this does is send a
WM_CLOSE message to ourselves, which will have the
same effect as if the user clicked on the [x] button on the top of our window.
The two 0's are the wParam and lParam which aren't used for the WM_CLOSE message.
Your WM_COMMAND handler should now look like this:
   switch(LOWORD(wParam))
   {
      case CM_FILE_EXIT:
         PostMessage(hwnd, WM_CLOSE, 0, 0);
      break;
      case CM_STUFF_GO:

      break;
   }
I leave it up to you to make the other menu command
CM_STUFF_GO do something. If by now your program doesn't look much like mine
becuase you've tried your own changes and improvements, great. Anything I show
you from now own you should be able to integrate with whatever you have by
adding messag handlers and so on. Try looking up other messages in your help
files and handling them, especially ones with usefull parameters.
Download dlg_one.zip
![[images/dlg_one.gif]](dlg_one.gif) There's hardly
a windows program out there that doesn't use dialog boxes. Just go File ->
Open in any text editor or any other kind of editor for that matter and voila,
you are presented with a dialog box, one that probably allows you to select a
file to be opened.
There's hardly
a windows program out there that doesn't use dialog boxes. Just go File ->
Open in any text editor or any other kind of editor for that matter and voila,
you are presented with a dialog box, one that probably allows you to select a
file to be opened.
Dialogs aren't limited to the standard open file ones, they can look like and do whatever you choose. The attractive point of dialogs is that they provide a quick way to arrange and create a GUI (Graphic User Interface) and even some default processing, cutting down on the amount of code you must write.
The first step is to create the dialog resource. As with any resource how you do this will depend on your compiler/IDE. Here I will show you the plain text of the dilaog in the .rc file and let you incorporate it into your project.
ABOUTDLG DIALOG 0, 0, 155, 102
STYLE DS_MODALFRAME | DS_3DLOOK | WS_POPUP | WS_VISIBLE | WS_CAPTION | WS_SYSMENU
CAPTION "This is my About Box"
FONT 8, "MS Sans Serif"
{
   CONTROL "&OK", IDOK, "BUTTON", BS_DEFPUSHBUTTON | BS_CENTER | WS_CHILD | WS_VISIBLE | WS_TABSTOP, 6, 83, 50, 14
   CONTROL "&Cancel", IDCANCEL, "BUTTON", BS_PUSHBUTTON | BS_CENTER | WS_CHILD | WS_VISIBLE | WS_TABSTOP, 95, 83, 50, 14
   CONTROL "About This Program", -1, "button", BS_GROUPBOX | WS_CHILD | WS_VISIBLE | WS_GROUP, 5, 5, 144, 73
   CONTROL "An example program showing how to use dialog boxes.\r\n\r\nby theForger", -1, "static", SS_CENTER | WS_CHILD | WS_VISIBLE, 27, 27, 100, 50
}
On this first line, ABOUTDLG is the name of the
resource. DIALOG is the resource type, and the four number are the Left, Top,
Width and Height co-ordinates. These ARE NOT PIXELS, they are in dialog units.
Play around with them to see the relationship between pixels and these units.
The actual pixel size will depend on the size of the font selected and shown on
the dialog.
The second line starts with STYLE and follows with the window styles that will be used to create the dialog. These should be explained under CreateWindow() in your help files.
The CAPTION line should be self explanitory.
The FONT line specifies the size and name of the font you wish to use for this dialog box. This might not end up exactly the same on each computer as different people will have different fonts and may have specified different font sizes. You usually don't need to worry about that though.
Now we have the list of controls to create on the dialog
CONTROL "&OK", IDOK, "BUTTON", BS_DEFPUSHBUTTON | BS_CENTER | WS_CHILD | WS_VISIBLE | WS_TABSTOP, 6, 83, 50, 14Here's the line for the OK button. It starts with CONTROL and is followed by the text of the control. The & in this case like with menus underlines the next letter "O", so that by pressing Alt+O the user can activate this control (part of the default processing I mentioned). IDOK is the control identifier. IDOK is pre-defined so we don't need to #define it ourselves. "BUTTON" is the name of the window class, this is what specifies what kind of control it's going to be. Other possibilities are "EDIT", "LISTBOX", and "COMBOBOX" to name a few of the standard controls. Next are the controls window styles, just like the styles used for CreateWindow(). BS_DEFPUSHBUTTON says make this the default button, and BS_CENTER centers the text in the middle of the button. The BS_* styles are specific to buttons. The four numbers at the end are the left, top, width and height, all in dialog units.
This information should be purely academic, as you almost always use a resource editor to create dialogs, but knowing how to do it from text is sometimes necessary, expecially if you have no visual editor.
Two of the controls have an ID of -1, this is used to indicate we never need to access them, so they have no need of an identifier. However it doesn't hurt to give them an ID and your resource editor might do so automatically.
The "\r\n" in the text of the static control is a CR-LF pair, the way windows represents a new line.
So! Having added that to your .rc file we need to write a Dialog Procedure to process message for this box. Don't worry this is nothing new, it's practicly the same as our main Window Procedure.
BOOL CALLBACK AboutDlgProc(HWND hwnd, UINT Message, WPARAM wParam, LPARAM lParam)
{
   switch(Message)
   {
      case WM_INITDIALOG:

      return TRUE;
      case WM_COMMAND:
         switch(LOWORD(wParam))
         {
            case IDOK:
               EndDialog(hwnd, IDOK);
            return TRUE;
            case IDCANCEL:
               EndDialog(hwnd, IDCANCEL);
            return TRUE;
         }
      break;
   }
   return FALSE;
}
There are a few important differences bewteen a
dialog procedure and window procedure. One is that you DO NOT call DefWindowProc
for message you don't handle. For dialogs this is done automatically for you.
Secondly, you return FALSE for messages you don't preocess, and TRUE for messages you do process, UNLESS the message specifies you return something else.
Thirdy, You do not call DestroyWindow to close a dialog, you call EndDialog. The second paramter to which is the value that is returned to whatever code created the dialog.
Finally, instead of handling WM_CREATE, you handle WM_INITDIALOG to do any processing that needs to be done before the dialog appears, and then return TRUE to have the keyboard focus set to the default control.
Enough chit-chat, lets create the damn thing.
int ret;

   case CM_HELP_ABOUT:
      ret = DialogBox(g_hInst, "ABOUTDLG", hwnd, AboutDlgProc);
      if(ret == IDOK){
         MessageBox(hwnd, "Dialog exited with IDOK.", "Notice",
            MB_OK | MB_ICONINFORMATION);
      }
      else if(ret == IDCANCEL){
         MessageBox(hwnd, "Dialog exited with IDCANCEL.", "Notice",
            MB_OK | MB_ICONINFORMATION);
      }
      else if(ret == -1){
         MessageBox(hwnd, "Dialog failed!", "Error",
            MB_OK | MB_ICONINFORMATION);
      }
   break;
This is the code I used to create my about box, you
can probably guess that this is to be merged into your WM_COMMAND handler, if
you aren't clear on this aspect, you might want to review the section on menus.
CM_HELP_ABOUT is the identifier of my Help -> About menu item.
NOTE: this goes into your Main Window Procedure, NOT your Dialog Procedure.
Now I stored the return value from the call to DialogBox, this is just so you can observe the effects of pressing the two buttons, hitting ESC, ENTER etc... from inside the dialog. It also illustrates how to use the return value from a dialog box to check for success, failure, a users choice, or whatever other information you choose to send back to the caller from the Dialog Procedure.
DialogBox(g_hInst, "ABOUTDLG", hwnd, AboutDlgProc);This is the only important part, and you can choose to put it wherever in your code that you want the dialog to come up. "ABOUTDLG" is the name of the dialog resource.
hwnd is
the handle to the parent window of the dialog. AboutDlgProc is of course the
dialog procedure to use to control the dialog.
That's it! Sit IDD_UBU, sit.
First thing. DialogBox create the dialog and then does not return until the dialog calls EndDialog for whatever reason. If you want the dialog to be created and then hang around while your code goes on to do other things, and allows the user to interact with the rest of your program, you want to use CreateDialog in place of DialogBox. CreateDialog return a handle to the new window immediately. You can use DestroyWindow() to kill it when it is no longer needed.
Second, dialogs usually contain fancier control than just buttons, like listboxes, comboboxes, edit controls, check boxes, and even the newer Common Controls: rich edit, ListView, TreeView etc...
These controls will probably be covered later but for now here are a few usefull functions to help you explore on your own.
Also look up DialogBoxParam(), and CreateDialogParam(), for an easy way to pass information to a dialog you are creating.
A few notes on Dialog behaviour. Hitting the TAB key moves through the controls in the order they were created as long as they have the WS_TABSTOP style set. Hitting the Enter key while the keyboard focus is NOT on a button will activate the default button if one is set. The default default button is IDOK. Hitting ESC sends an IDCANCEL, and clicking the [x] button also sends an IDCANCEL by default.
Without controls, GUI programming would be a pain in the ass for sure (even more than it already is). Buttons, Edit Boxes, Check Boxes, Sliders, Static Text, are all controls. Now controls are windows, just like any of our windows that we create, except they have pre-defined window classes and window procedures for handling them, their behaviour and appearance.
We've already done buttons in our last dialog example, so now I'll do a few real-quick examples of how to use some of the other controls. These will be completely useless but will demonstrate their use so you can add them in to other projects, and so I won't need to explain them in further examples.
Download edit_single.zip
![[edit_single.gif]](edit_single.gif) Marvelously
usefull, the Edit Box. Here's an example of a single-line edit control that
allows the user to set the caption on the window.
Marvelously
usefull, the Edit Box. Here's an example of a single-line edit control that
allows the user to set the caption on the window.
The .rh
#define IDC_EDITDLG_TEXT      101
#define IDC_EDITDLG_SETTEXT   102
The .rc
#include "edit_single.rh"

EDITDLG DIALOG 0, 0, 149, 49
STYLE DS_MODALFRAME | DS_3DLOOK | DS_CENTER | 0x200L | WS_POPUP | WS_VISIBLE | WS_CAPTION | WS_SYSMENU
CAPTION "A Window"
FONT 8, "MS Sans Serif"
{
 CONTROL "", IDC_EDITDLG_TEXT, "edit", ES_LEFT | ES_AUTOHSCROLL | WS_CHILD | WS_VISIBLE | WS_BORDER | WS_TABSTOP, 3, 8, 139, 12
 CONTROL "&Set Text", IDC_EDITDLG_SETTEXT, "button", BS_DEFPUSHBUTTON | BS_CENTER | WS_CHILD | WS_VISIBLE | WS_TABSTOP, 6, 28, 50, 14
 CONTROL "&Close", IDCANCEL, "BUTTON", BS_PUSHBUTTON | BS_CENTER | WS_CHILD | WS_VISIBLE | WS_TABSTOP, 92, 28, 50, 14
}
The .c
#include <windows.h>
#include "edit_single.rh"

#define BUFFER_SIZE 256

BOOL CALLBACK EditDlgProc(HWND hwnd,UINT Message, WPARAM wParam, LPARAM lParam)
{
   char szText[BUFFER_SIZE];

   switch(Message)
   {
      case WM_INITDIALOG:
         SendDlgItemMessage(hwnd, IDC_EDITDLG_TEXT, EM_SETLIMITTEXT,
            (WPARAM)BUFFER_SIZE - 1, (LPARAM)0);
      return TRUE;
      case WM_COMMAND:
         switch(LOWORD(wParam))
         {
            case IDC_EDITDLG_SETTEXT:
               GetDlgItemText(hwnd, IDC_EDITDLG_TEXT, szText, BUFFER_SIZE);
               SetWindowText(hwnd, szText);
            return TRUE;
            case IDCANCEL:
               EndDialog(hwnd, IDCANCEL);
            return TRUE;
         }
      break;
   }
   return FALSE;
}


int WINAPI WinMain(HINSTANCE hInstance, HINSTANCE hPrevInstance,
   LPSTR lpCmdLine, int nCmdShow)
{
   DialogBox(hInstance, "EDITDLG", 0, EditDlgProc);
   return 0;
}
Things of note... in WM_INITDIALOG we set the
maximum length of text allowed in the edit control. This is the maximum number
of characters you will be able to type in. Note that it is one LESS than the
size of out buffer, this is because we need to leave one byte for the null
terminator. GetDlgItemText and GetWindowText (which we didn't use) both take as
a paramter the buffer to put the text in and the size of the buffer. They will
therefor reuturn a maximum of one less character than the size of the buffer to
make sure there is room for the null. ie. if the buffer is 10 bytes, it will
return a maximum of 9 characters.
We've made the "Set Text" button the default so that hittng Enter while in the edit control will trigger it. You can also trigger it by hitting Alt+S because that is the underlined letter (see the "&" in the control text). If you want the enter to actually go into the edit box and create a new line then you need to set the ES_WANTRETURN and ES_MULTILINE styles.
That's the last call to DialogBox I'll show unless necessary, you should be able to figure it out on your own from now on. Also I'll expect you to be able to handle writing your own .rh files.
Download check_one.zip
These are for when you want an option to be on or off, and that isn't exclusive of other options. When you have a series of check boxes in a window you can set any of them on or off with no effect on the others.The Dialog resource.
CHECKDLG DIALOG 0, 0, 152, 46
STYLE DS_MODALFRAME | DS_3DLOOK | DS_CENTER | 0x200L | WS_POPUP | WS_VISIBLE | WS_CAPTION | WS_SYSMENU
CAPTION "A Window"
FONT 8, "MS Sans Serif"
{
 CONTROL "This &here is a check box.", IDC_CHECKDLG_ACHECK, "button", BS_AUTOCHECKBOX | WS_CHILD | WS_VISIBLE | WS_TABSTOP, 7, 8, 107, 12
 CONTROL "&Check the Check", IDC_CHECKDLG_CHECKTHECHECK, "button", BS_PUSHBUTTON | BS_CENTER | WS_CHILD | WS_VISIBLE | WS_TABSTOP, 5, 26, 81, 14
 CONTROL "E&xit", IDCANCEL, "BUTTON", BS_PUSHBUTTON | BS_CENTER | WS_CHILD | WS_VISIBLE | WS_TABSTOP, 95, 26, 50, 14
}
The Dialog Procedure.
BOOL CALLBACK CheckDlgProc(HWND hwnd, UINT Message, WPARAM wParam, LPARAM lParam)
{
   switch(Message)
   {
      case WM_INITDIALOG:
         CheckDlgButton(hwnd, IDC_CHECKDLG_ACHECK, BST_CHECKED);
      return TRUE;
      case WM_COMMAND:
         switch(LOWORD(wParam))
         {
            case IDC_CHECKDLG_CHECKTHECHECK:
               if(IsDlgButtonChecked(hwnd, IDC_CHECKDLG_ACHECK) == BST_CHECKED){
                  MessageBox(hwnd, "The Box is CHECKED!", "Woo.",
                     MB_OK | MB_ICONINFORMATION);
               }
               else {
                  MessageBox(hwnd, "The Box is NOT checked!", "Woo.",
                     MB_OK | MB_ICONINFORMATION);
               }
            return TRUE;
            case IDCANCEL:
               EndDialog(hwnd, IDCANCEL);
            return TRUE;
         }
      break;
   }
   return FALSE;
}
In WM_INITDIALOG we set the box to be initially
checked. Then when we get the WM_COMMAND from our button we check to see whether
it is checked or not.
Now this check box was an BS_AUTOCHECKBOX, which mean it handles the checking/unchecking automatically. Change the BS_AUTOCHECKBOX to BS_CHECKBOX and run the program again. What happens? You can't change the check box! This is becuase it's operation is no longer automatic, we need to do it manually....
BOOL CALLBACK CheckDlgProc(HWND hwnd, UINT Message, WPARAM wParam, LPARAM lParam)
{
   switch(Message)
   {
      case WM_INITDIALOG:
         CheckDlgButton(hwnd, IDC_CHECKDLG_ACHECK, BST_CHECKED);
      return TRUE;
      case WM_COMMAND:
         switch(LOWORD(wParam))
         {
            case IDC_CHECKDLG_ACHECK:
               if(MessageBox(hwnd, "Are you sure?", "Boo!", MB_YESNO) == IDYES)
               {
                  if(IsDlgButtonChecked(hwnd, IDC_CHECKDLG_ACHECK) == BST_CHECKED)
                  {
                     CheckDlgButton(hwnd, IDC_CHECKDLG_ACHECK, BST_UNCHECKED);
                  }
                  else
                  {
                     CheckDlgButton(hwnd, IDC_CHECKDLG_ACHECK, BST_CHECKED);
                  }
               }
            break;
            case IDC_CHECKDLG_CHECKTHECHECK:
               if(IsDlgButtonChecked(hwnd, IDC_CHECKDLG_ACHECK) == BST_CHECKED){
                  MessageBox(hwnd, "The Box is CHECKED!", "Woo.",
                     MB_OK | MB_ICONINFORMATION);
               }
               else {
                  MessageBox(hwnd, "The Box is NOT checked!", "Woo.",
                     MB_OK | MB_ICONINFORMATION);
               }
            return TRUE;
            case IDCANCEL:
               EndDialog(hwnd, IDCANCEL);
            return TRUE;
         }
      break;
   }
   return FALSE;
}
Download check_two.zip
![[images/check_two.gif]](check_two.gif) A Check box
is a type of button, and so just like any other button we get a WM_COMMAND
message when it's clicked. By handling it this way we get to do any processing
we want to before changing it's state, in this case we ask the user to confirm
their action(this is highly annoying and used only for the purposes of
demonstration).
A Check box
is a type of button, and so just like any other button we get a WM_COMMAND
message when it's clicked. By handling it this way we get to do any processing
we want to before changing it's state, in this case we ask the user to confirm
their action(this is highly annoying and used only for the purposes of
demonstration).
With that thought I leave controls for now. I will of course be using them more later but they will be in the context of more usefull programs. Besides this is meant to be a tutorial/introduction, not a reference. Once you get the hang of using a few controls, the others should be no sweat.
   case WM_CREATE:
      CreateWindow("EDIT", "",
         WS_CHILD | WS_VISIBLE | WS_HSCROLL | WS_VSCROLL | ES_MULTILINE |
            ES_WANTRETURN,
         CW_USEDEFAULT, CW_USEDEFAULT, CW_USEDEFAULT, CW_USEDEFAULT,
         hwnd, (HMENU)IDC_MAIN_TEXT, g_hInst, NULL);

      SendDlgItemMessage(hwnd, IDC_MAIN_TEXT, WM_SETFONT,
         (WPARAM)GetStockObject(DEFAULT_GUI_FONT), MAKELPARAM(TRUE, 0));
   break;
   case WM_SIZE:
      if(wParam != SIZE_MINIMIZED)
         MoveWindow(GetDlgItem(hwnd, IDC_MAIN_TEXT), 0, 0, LOWORD(lParam),
            HIWORD(lParam), TRUE);
   break;
There, all done. Now we have a nice edit box which
fills our entire window, even if it is re-sized. Most of the parameter to that
CreateWindow call should be easily deciphered by reading your help. The one
which might seem odd is the (HMENU)IDC_MAIN_TEXT. This is the same as the ID we
assigned to controls when we put them in our dialogs. (It's not really an HMENU,
we just cast it like that because that's the type of the parameter it needs. If
you have a problem with that, take it up with MS). You don't NEED to assign an
ID to child windows you create, you can simply store the HWND returned by
CreateWindow, but I think this way is more elegant. You can use GetDlgItem (yes
I know it's not a Dialog, just trust me) to retreive the hwnd whenever you want.
I send a WM_SETFONT to the edit to set it to your default font used in dialogs. If I didn't, you'd get the default ugly system font.
In the WM_SIZE we resize the control to fit the new dimentions of our window, unless the window has been minimised, in which case there is no need.
This process is not limited to EDIT's, you can create buttons, slider, or any other kind of control this way as well.
You know that dialog box you get when you go File -> Open in almost any program? Chances are it is one of the Common Dialogs; these are pre-defined dialogs with pre-defined behaviour to do tasks that are so common that everybody would get really annoyed if they had to re-program them into every application.
It is a simple task to allow the user to choose a file for opening...
   case CM_FILE_OPEN:
   {
      OPENFILENAME ofn;
      char szFileName[MAX_PATH];

      ZeroMemory(&ofn, sizeof(ofn));
      szFileName[0] = 0;

      ofn.lStructSize = sizeof(ofn);
      ofn.hwndOwner = hwnd;
      ofn.lpstrFilter = "Text Files (*.txt)\0*.txt\0All Files (*.*)\0*.*\0\0";
      ofn.lpstrFile = szFileName;
      ofn.nMaxFile = MAX_PATH;
      ofn.Flags = OFN_EXPLORER | OFN_FILEMUSTEXIST | OFN_HIDEREADONLY;
      ofn.lpstrDefExt = "txt";

      if(GetOpenFileName(&ofn)){
         MessageBox(hwnd, szFileName, "You chose...", MB_OK);
      }
   }
   break;
You would of course do something more usefull than
popup a MessageBox. There are a whole mess of other options to set in the
OPENFILENAME struct, but I rarely use any of them. A similar call can be made
for GetSaveFileName, which does essentially the same thing.
Other Common Dialogs allow the user to select a color, a printer, a font and so on.
Since this is a Win32 API document I will cover the Win32 API functions. Chances are these calls eventually call the standard C functions at some point anyway. If you wish to use one of the other file manipulation techniques, feel free to do so.
Say for example you have allowed the user to select a file using GetOpenFileName()...
BOOL LoadFile(HWND hEdit, LPSTR pszFileName)
{
   HANDLE hFile;
   BOOL bSuccess = FALSE;

   hFile = CreateFile(pszFileName, GENERIC_READ, FILE_SHARE_READ, NULL,
      OPEN_EXISTING, NULL, NULL);
   if(hFile != INVALID_HANDLE_VALUE)
   {
      DWORD dwFileSize;
      dwFileSize = GetFileSize(hFile, NULL);
      if(dwFileSize != 0xFFFFFFFF)
      {
         LPSTR pszFileText;
         pszFileText = GlobalAlloc(GPTR, dwFileSize + 1);
         if(pszFileText != NULL)
         {
            DWORD dwRead;
            if(ReadFile(hFile, pszFileText, dwFileSize, &dwRead, NULL))
            {
               pszFileText[dwFileSize] = 0; // Null terminator
               if(SetWindowText(hEdit, pszFileText))
                  bSuccess = TRUE; // It worked!
            }
            GlobalFree(pszFileText);
         }
      }
      CloseHandle(hFile);
   }
   return bSuccess;
}
There is a complete function to read a text file
into an edit control. It takes as paramters the handle to the edit control and
the name of the file to read in. This perticular function has a fair bit of
error checking, File IO is one place where a lot of things can go wrong, and so
you need to be on the lookout for errors.
Note the variable dwRead, we don't use it except as a paramter in ReadFile. This parameter MUST be there, the call will fail without it.
In the call to CreateFile GENERIC_READ means we only want read access. FILE_SHARE_READ means it's okay if other programs open the file at the same time we do, but ONLY if they want to read as well, we don't want them writing to the file while we are reading it. And OPEN_EXISTING means only open the file if it already exists, don't create it, and don't overwrite it.
BOOL SaveFile(HWND hEdit, LPSTR pszFileName)
{
   HANDLE hFile;
   BOOL bSuccess = FALSE;

   hFile = CreateFile(pszFileName, GENERIC_WRITE, NULL, NULL,
      CREATE_ALWAYS, FILE_ATTRIBUTE_NORMAL, NULL);
   if(hFile != INVALID_HANDLE_VALUE)
   {
      DWORD dwTextLength;
      dwTextLength = GetWindowTextLength(hEdit);
      if(dwTextLength > 0)// No need to bother if there's no text.
      {
         LPSTR pszText;
         pszText = GlobalAlloc(GPTR, dwTextLength + 1);
         if(pszText != NULL)
         {
            if(GetWindowText(hEdit, pszText, dwTextLength + 1))
            {
               DWORD dwWritten;
               if(WriteFile(hFile, pszText, dwTextLength, &dwWritten, NULL))
                  bSuccess = TRUE;
            }
            GlobalFree(pszText);
         }
      }
      CloseHandle(hFile);
   }
   return bSuccess;
}
Almost identical to the previous function for
reading. Note that in both cases we need to allocate an extra byte to account
for the NULL terminator on the text.
Download file_one.zip
Download image_one.zip
![[images/image_one.gif]](image_one.gif) Graphics!
Finally, we get to the interesting stuff! First we'll do a simple still image,
then some animation.
Graphics!
Finally, we get to the interesting stuff! First we'll do a simple still image,
then some animation.
Basic windows graphics, using the GDI(Graphics Device Interface) revolves around Bitmaps (HBITMAP), and Device Contexts (HDC). A Bitmap is, of course, an image, DC's are a little more complex. While using GDI you don't change your images directly, you manipulate them with the GDI API calls which alter the image via a Device Context.
A Device Context is a generic handle for an imaging device, a monitor, window, printer or an in memory image. Thus you can use the same code (well, sortof) to draw to a printer as you can to draw to the screen.
In order to use images, we create a Memory DC. At first this is useless as it has nowhere to draw to, so along with the DC we create a Bitmap. We select the bitmap into the DC, and voila! We can now draw to the Memory DC, which affects the Bitmap selected into it. IMPORTANT NOTE: When you are drawing to a Memory DC you are actually drawing on the Bitmap selected into it, NOT the DC itself! Just like when you draw to a screen DC, the changes affect the screen, not the DC itself. A memory DC is the ONLY kind of DC you can select a Bitmap into.
On with the show. First you need to add a bitmap to your .rc file:
BALLBMP BITMAP "ball.bmp"This assumes of course that you have a bitmap file called ball.bmp in the same directory as the .rc. In our program we need to create a variable to store the image, and then load it from the resource....
HBITMAP hbmBall;

hbmBall = LoadBitmap(g_hInst, "BALLBMP");
if(!hbmBall){
   MessageBox(hwnd, "Load of resource BALLBMP failed.", "Error",
      MB_OK | MB_ICONEXCLAMATION);
}
This should be pretty straightforward...next we need
to handle the WM_PAINT message, which tell us we need to re-draw our window.
This happens after such thing as having another window moved away from covering
ours.
if(hbmBall)
{
   PAINTSTRUCT ps;
   HDC hdcMemory, hdcWindow;
   BITMAP bm;

   hdcWindow = BeginPaint(hwnd, &ps);
   hdcMemory = CreateCompatibleDC(hdcWindow);

   SelectObject(hdcMemory, hbmBall);
   GetObject(hbmBall, sizeof(bm), &bm);

   BitBlt(hdcWindow, 0, 0, bm.bmWidth, bm.bmHeight, hdcMemory, 0, 0, SRCCOPY);

   DeleteDC(hdcMemory);
   EndPaint(hwnd, &ps);
}
Here's the fun part... BeginPaint is called which
returns a Window DC for us to draw on. when we draw to this DC, it effects the
Client Area or our window. The client area is the the part of the window that
does NOT include the title, menu, and border. You can safely ignore the
PAINTSTRUCT for now, it's just there because Being/EndPaint need it.
Next CreateCompatibleDC creates a Memory DC that is compatible with our Window DC. This DC is initially empty. We need to call SelectObject to select the Bitmap into the Memory DC. Now operations performed on the DC use and affect the Bitmap.
We use GetObject to get the bitmap info, width and height, and store it in a BITMAP struct.
BitBlt is da bomb! BitBlt copies TO the first DC (hdcWindow), FROM the second one (hdcMemory). If you switched the DCs, then you would effectively take a snapshop of the Window and store it in the Bitmap! The four parameters following the first DC are the x, y, width and height, for the Destination (where to put the image). The two parameters after the second DC are the x and y co-ordinates of the top-left of the image, (where to start copying from). The last parameter is the type of operation to perform. In this case we use SRCCOPY which means COPY the SouRCe DC (the image) to the destination DC (the window). After we're done we delete the memory DC, and release the window DC with a call to EndPaint(). When we're done with the Bitmap, we can get rid of it thusly...
DeleteObject(hbmBall);
Download image_two.zip
![[image_two.gif]](image_two.gif) Not too difficult
and much better looking, pictures with a transparent color. This requires the
use of TWO images, one color image, and one monochrome image for a mask. This is
the way it works... On the color image, you need to make sure that eveywhere you
want transparent is BLACK (Other places can be black as well). Then you create
the mask, which is the same size as the color image but is black and white. The
mask must be WHITE where you want Transparent, and BLACK elsewhere.
Not too difficult
and much better looking, pictures with a transparent color. This requires the
use of TWO images, one color image, and one monochrome image for a mask. This is
the way it works... On the color image, you need to make sure that eveywhere you
want transparent is BLACK (Other places can be black as well). Then you create
the mask, which is the same size as the color image but is black and white. The
mask must be WHITE where you want Transparent, and BLACK elsewhere.
![[ball.gif]](ball.gif) Color Image.
Color Image.![[ballmask.gif]](ballmask.gif) Mask.
Mask.
By combining these images at run-time we give an effect of transparency. First off, add the mask to your resource, and load it like you did the color image. All we have to do now is change the way we draw a little bit...
if(hbmBall && hbmMask)
{
   PAINTSTRUCT ps;
   HDC hdcMemory, hdcWindow;
   BITMAP bm;

   hdcWindow = BeginPaint(hwnd, &ps);
   hdcMemory = CreateCompatibleDC(hdcWindow);

   GetObject(hbmBall, sizeof(bm), &bm);

   SelectObject(hdcMemory, hbmMask);
   BitBlt(hdcWindow, 0, 0, bm.bmWidth, bm.bmHeight, hdcMemory, 0, 0, SRCAND);

   SelectObject(hdcMemory, hbmBall);
   BitBlt(hdcWindow, 0, 0, bm.bmWidth, bm.bmHeight, hdcMemory, 0, 0, SRCPAINT);

   DeleteDC(hdcMemory);
   EndPaint(hwnd, &ps);
}
Most of this is the same as before, only now we use
two images one after the other. First we select the Mask into the Memory DC, and
Blt it to the window. We use the SRCAND paramter to indicate we want to combine
the Destination and Source images with a bitwise AND operation. This has the
effect of making the image black where we want the color image to go, and
leaving the transparent parts untouched.
Next we select the color image into the Memory DC, this replaces the mask image, which becomes de-selected. We copy this to the Window DC with the SRCPAINT parameter. This does a bitwise OR operation to combine the source and destination. This has the effect of coloring in the blackened part, and also leaves the transparent part untouched.
Why did we bother with the mask then, if the second call is appearently transparent all on it's own? Well because the second call only works if the image beneath it is black, this is why we need to black it out with the mask first. (To fully understand this, you need to understand bitwise operations, OR and AND).
Only read this paragraph if you care about doing things the absolute right way. When calling SelectObject, the previous object of the same type that you are selecting gets de-selected. So if I select a bitmap into the DC, the previous bitmap gets de-selected. Now when you create a DC, there are certain objects created by default, pens, brushes, fonts, etc... and so when you select in a new one, you need to store the return value (which is the old object) and put it back when you are done. If you don't, these dead objects build up in memory and waste resources, a Very Bad Thiing. HOWEVER the documentation I have seen says is that there is NO default Bitmap. And thus we don't need to worry about storing and replacing it (although you can if you want to). This is a subject of much debate, as nobody seems to know for sure. MS's documents sometimes seem to contradict themselves, and in MS's examples they don't worry about replaceing this default object. GDI is general seems to be a large grey area where nobody really knows what is going on. And so my final point: This is the way I do it, and it works. But if I turn out to be wrong, don't blame me for providing false information. It is true to the best of my knowledge.
Download anim_one.zip
![[images/anim_one.gif]](anim_one.gif) Animation!
Probably the reason most people start windows programming, because they want to
make cool looking stuff.
Animation!
Probably the reason most people start windows programming, because they want to
make cool looking stuff.
For simplistic animation (which is the only kind I'm going to cover, sorry) you can use the low-resolution windows timer. SetTimer() sets a timer and either calls a function of your choosing, or posts a WM_TIMER to your window. We'll go the WM_TIMER method.
   const UINT idTimer1 = 1;
   UINT nTimerDelay = 100;

   SetTimer(hwnd, idTimer1, 100, NULL);
Not much to it, idTimer is a unique number to identify the timer, and nTimerDelay is the delay in milliseconds between ticks (specifies how often we get the message).
   case WM_TIMER:
      if(hbmBall && hbmMask)
      {
         HDC hdcWindow;
         hdcWindow = GetDC(hwnd);

         EraseBall(hdcWindow);
         UpdateBall(hwnd);
         DrawBall(hdcWindow);

         ReleaseDC(hwnd, hdcWindow);
      }
   break;
We get the DC a different way then in WM_PAINT.
BeginPaint and EndPaint are used ONLY in handling a WM_PAINT message. Other
times you use GetDC to grab the Client DC of the window in question, and use
ReleaseDC when you are done with it.
As you can see I've seperated the actual functionality of this message into three custom functions which I wrote to accomplish the task of erasing the old image, calculating the position of the new one and then finally drawing the new one.
void EraseBall(HDC hdc)
{
   RECT rc;
   rc.left = ballX;
   rc.top = ballY;
   rc.right = ballX + bm.bmWidth;
   rc.bottom = ballY + bm.bmHeight;
   FillRect(hdc, &rc, (HBRUSH)(COLOR_BTNFACE+1));
}

void UpdateBall(HWND hwnd)
{
   RECT rc;
   GetClientRect(hwnd, &rc);

   ballX += deltaX;
   ballY += deltaY;

   if(ballX < 0){
      ballX = 0;
      deltaX = deltaValue;
   }
   else if(ballX + bm.bmWidth > rc.right){
      ballX = rc.right - bm.bmWidth;
      deltaX = -deltaValue;
   }
   if(ballY < 0){
      ballY = 0;
      deltaY = deltaValue;
   }
   else if(ballY + bm.bmHeight > rc.bottom){
      ballY = rc.bottom - bm.bmHeight;
      deltaY = -deltaValue;
   }
}

void DrawBall(HDC hdc)
{
   HDC hdcMemory;
   hdcMemory = CreateCompatibleDC(hdc);

   SelectObject(hdcMemory, hbmMask);
   BitBlt(hdc, ballX, ballY, bm.bmWidth, bm.bmHeight, hdcMemory, 0, 0, SRCAND);

   SelectObject(hdcMemory, hbmBall);
   BitBlt(hdc, ballX, ballY, bm.bmWidth, bm.bmHeight, hdcMemory, 0, 0, SRCPAINT);

   DeleteDC(hdcMemory);
}
Nothing really new here, I use FillRect to erase
over the image of the ball, then calculate a new position checking to make sure
it doesn't go outside the window, and then draw the ball just like we did before
when it didn't move.
A few notes about UpdateBall; I've said this already but just to be clear... In windows (usually) the co-ordinate structure is such that the left side of something has an X value of 0 and X increases to the right. The top of a window or the screen (depending) has a Y value of 0 and it increases downwards. GetClientRect fills a RECT with the co-ordinates of the windows client area. The left and top values are ALWAYS zero. The right and bottom values are the width and height of the client area respectively. The client area again is the blank part of the window that is NOT the menu, title, frame etc...
When we're all done, we get rid of our timer (there are only so many to go around).
KillTimer(hwnd, idTimer1);That's pretty much it for basic animation! Now it's up to you to think of something cool to do with it. (Leave out the EraseBall call out for a trailing effect, as shown in the picture).
Download anim_two.zip
You probably noticed a bit of a flicker in the last example (or a lot of a flicker, depending on your hardware/drivers). This is due the the fact that we are erasing the last image and then drawing the new one in two steps, so you get a flicker as the images erases and draws over and over.One way of alleviating this problem is to use double buffering. This is essentially doing all your drawing and updates off screen, and then Blt'ing them to the screen in a single motion. This is especially handy when multiple objects are being drawn.
Since we are allocating a buffer in memory we want to me more picky about the size of your window. We make it a fixed size and declare a few constants for the width and height of our animation area (see example code).
   hdcBuffer = CreateCompatibleDC(0);
   SelectObject(hdcBuffer, hbmBall);
   hbmBuffer = CreateCompatibleBitmap(hdcBuffer, ANIM_WIDTH, ANIM_HEIGHT);
   SelectObject(hdcBuffer, hbmBuffer);
   if(!hbmBuffer){
      MessageBox(hwnd, "Buffer creation failed.", "Error",
         MB_OK | MB_ICONEXCLAMATION);
      return -1;
   }
We add this to our WM_CREATE to create a bitmap in
memory and a DC in memory as well, since we'll be using it a lot it makes sense
to keep it around instead of creating it each time we draw (not necessarily a
fantastic idea, but it shouldn't hurt). The reason I initially select the ball
image into the DC is so that our created bitmap will be the same bit-depth. We
then replace the ball with the buffer image and leav it there for the duration
of the program.
   if(hbmBall && hbmMask)
   {
      HDC hdcWindow;
      hdcWindow = GetDC(hwnd);

      EraseBall(hdcBuffer);
      UpdateBall();
      DrawBall(hdcBuffer);

      BitBlt(hdcWindow, 0, 0, ANIM_WIDTH, ANIM_HEIGHT, hdcBuffer, 0, 0, SRCCOPY);

      ReleaseDC(hwnd, hdcWindow);
   }
This is our revised drawing routine. We now draw to
the buffer in memory first and then Blt the whole thing to the screen. Ideally
we'd keep track of what has changed and only Blt that, but I'm trying to keep
this simple.
That's pretty much it for explaining, the code has a few more changes but they are not major nor essentially double-buffer related.
Download mdi_one.zip
Diagram mdi_diagram.gif
![[mdi_one.gif]](mdi_one.gif) The Multiple Document
Interface! Okay, this section took a little more work for me than some of the
others since I haven't used MDI much (at all). Since I do not regularly use MDI,
the information I present here is not exactly tried and tested (but is correct
to the best of my knowledge).
The Multiple Document
Interface! Okay, this section took a little more work for me than some of the
others since I haven't used MDI much (at all). Since I do not regularly use MDI,
the information I present here is not exactly tried and tested (but is correct
to the best of my knowledge).
First a bit of background... Every window has a Client Area, this is where most programs draw images, place controls etc... the Client Area is not seperate from the window itself, it is simply a smaller specialised region of it. Sometimes a window can be all client area, and nothing else, sometimes the client area is smaller to make room for menus, titles, scrollbars, etc...
In MDI terms, your main window is called the Frame, this is probably the only window you would have in a SDI (Single Document Interface) program. In MDI there is an additional window, called the MDI Client Window which is a child of your Frame window. Unlike the Client Area it is a complete and seperate window all on it's own, it has a client area of it's own and probably a few pixels for a border. You never directly handle messages for the MDI Client, it is done by the pre-defined windows class "mdiclient". You can communicate and manipulate the MDI Client and the windows it contains through messages.
When it comes to the windows which actually display your document or whatever, you send a message to the MDI Client to tell it to create a new window of the type you've specified. The new window is created as a child of the MDI Client, not of your Frame window. This new window is an MDI Child. The MDI Child is a child of the MDI Client, which in turn is a child of the MDI Frame (Getting dizzy yet?). To make matters worse, the MDI Child will probably have child windows of its own, for instance the edit control in the example program for this section.
You are responsable for writing two (or more) Window Procedures. One, just like always, for your main window(the Frame). And one more for the MDI Child. You may also have more than one type of Child, in which case, you'll want a seperate window procedure for each type.
Doing MDI requires several changes and additions throughout your program. First of all, we need to register an extra window class for our child windows.
   WNDCLASSEX WndClassEx;

   WndClassEx.cbSize          = sizeof(WNDCLASSEX);
   WndClassEx.style           = CS_HREDRAW | CS_VREDRAW;
   WndClassEx.lpfnWndProc     = WndProc;
   WndClassEx.cbClsExtra      = 0;
   WndClassEx.cbWndExtra      = 0;
   WndClassEx.hInstance       = hInstance;
   WndClassEx.hIcon           = LoadIcon(NULL, IDI_APPLICATION);
   WndClassEx.hCursor         = LoadCursor(NULL, IDC_ARROW);
   WndClassEx.hbrBackground   = (HBRUSH)(COLOR_3DSHADOW+1);
   WndClassEx.lpszMenuName	   = "MAIN";
   WndClassEx.lpszClassName   = g_szAppName;
   WndClassEx.hIconSm		   = LoadIcon(NULL, IDI_APPLICATION);

   if(!RegisterClassEx(&WndClassEx))
   {
      MessageBox(0, "Could Not Register Window", "Oh Oh...",
         MB_ICONEXCLAMATION | MB_OK);
      return -1;
   }

   WndClassEx.lpfnWndProc     = MDIChildWndProc;
   WndClassEx.lpszMenuName	   = NULL;
   WndClassEx.lpszClassName   = g_szChild;
   WndClassEx.hbrBackground   = (HBRUSH)(COLOR_3DFACE+1);

   if(!RegisterClassEx(&WndClassEx))
   {
      MessageBox(0, "Could Not Register Child Window", "Oh Oh...",
         MB_ICONEXCLAMATION | MB_OK);
      return -1;
   }
Here we've registered our regular window as usual,
but we've also called RegisterClassEx() a
second time, after specifying a different Window procedure, menu, classname, and
background color. Feel free to change more or less to suit your needs. We now
have two different kinds of custom windows we can create, our MDI Frame (our
normal window) and the MDI Child, which will be created via the MDI Client.
We also need to modify our message loop a little...
   while(GetMessage(&Msg, NULL, 0, 0))
   {
      if (!TranslateMDISysAccel(g_hMDIClient, &Msg))
      {
         TranslateMessage(&Msg);
         DispatchMessage(&Msg);
      }
   }
We've added an extra step (TranslateMDISysAccel()), what this does is check for
the pre-defined accelerator keys, Ctrl+F6 which swtiches to the next window,
Ctrl+F4 which closes the Child and so on. If you don't add in this check you
will annoy your users by not providing the standard behaviour they've gotten
used to, or you'll have to implement it manually.
Once our Frame is created just like normal, we want to
also create the MDI Client, so in our Frame window's WM_CREATE handler we do...
   CLIENTCREATESTRUCT ccs;

   // Find window menu where children will be listed
   ccs.hWindowMenu  = GetSubMenu(GetMenu(hwnd), 2);
   ccs.idFirstChild = ID_MDI_FIRSTCHILD;

   g_hMDIClient = CreateWindowEx(WS_EX_CLIENTEDGE, "mdiclient", NULL,
      WS_CHILD | WS_CLIPCHILDREN | WS_VSCROLL | WS_HSCROLL,
      CW_USEDEFAULT, CW_USEDEFAULT, CW_USEDEFAULT, CW_USEDEFAULT,
      hwnd, (HMENU)ID_MDI_CLIENT, g_hInst, (LPVOID)&ccs);

   ShowWindow(g_hMDIClient, SW_SHOW);
   return 0;
This creates the MDI Client, displays it and store
the handle in a global variable for later use. This is accomplished by
specifying the pre-defined window class "mdiclient" to CreateWindowEx.
ccs.hWindowMenu
specifies the menu to which the MDI Client will add a list of the Child windows
too. This menu is usually called "Window". The adding and removing of the
windows to the menu is handled automatically by the MDI Client. This allows the
user to switch to a specified window by clicking the approriate menu item. This
functionality is handled by DefFrameProc which we'll get to in a bit.
ccs.idFirstChild is a
number to use as the first ID for the items the Client adds to the Window
menu... you want this to be easily distinguishable from your own menu
identifiers so you can handle your menu commands and pass the Window menu
commands to DefWindowProc for processing. In the example I specify an identifier
defined as 50000, high enough that I know none of my menu command id's will be
above it.
There are a few changes that need to be made to the
WM_COMMAND handler for the Frame window...
   case WM_COMMAND:
   {
      switch(LOWORD(wParam))
      {
         case CM_FILE_EXIT:
            PostMessage(hwnd, WM_CLOSE, 0, 0);
         break;
         case CM_FILE_NEW:
         {
            MDICREATESTRUCT mcs;
            HWND hChild;

            mcs.szTitle = "[Untitled]";
            mcs.szClass = g_szChild;
            mcs.hOwner  = g_hInst;
            mcs.x = mcs.cx = CW_USEDEFAULT;
            mcs.y = mcs.cy = CW_USEDEFAULT;
            mcs.style = MDIS_ALLCHILDSTYLES;

            hChild = (HWND)SendMessage(g_hMDIClient, WM_MDICREATE,
               0, (LONG)&mcs);
            if(!hChild)
            {
               MessageBox(hwnd, "MDI Child creation failed.", "Oh Oh...",
                  MB_ICONEXCLAMATION | MB_OK);
            }
         }
         break;

         // handle more commands....

         default:
         {
            if(LOWORD(wParam) >= ID_MDI_FIRSTCHILD){
               DefFrameProc(hwnd, g_hMDIClient, Message, wParam, lParam);
            }
            else {
               HWND hChild;
               hChild = (HWND)SendMessage(g_hMDIClient, WM_MDIGETACTIVE,0,0);
               if(hChild){
                  SendMessage(hChild, WM_COMMAND, wParam, lParam);
               }
            }
         }
      }
   }
I've added a default: case, this will catch all commands that I
didn't process directly. I do a check to see if the value is greater than
ID_MDI_FIRSTCHILD. If it is, then the user has clicked on one of the Window menu
items and we send the message on to DefFrameProc for processing. If it isn't one
of the Window IDs then I get the handle to the active child window and forward
the message to it for processing. This allows you to delegate responsibility to
the Child windows for performing certain actions, and allows different child
windows to handle commands in different ways if so desired. In the example I
only handle commands that are global to the program in the Frame window
procedure, and send the commands which affect a certain document or child window
on to the child window itself for processsing.
In response to the File->New command we want to
create a new Child window. This is done not with the usual CreateWindow() but by sending a message to the MDI
Client (WM_MDICREATE) telling it to create a
child with the given properties specified in the MDICREATESTRUCT. You can look up the various members
of this struct in your documentation, they are fairly straight forward. The
return value from the WM_MDICREATE message is
the handle to the newly created window.
One member of MDICREATESTRUCT that I didn't use that can be quite
usefull is the lParam member. This can be used to send a 32bit value (like a
pointer) to the child you are creating, to provide it with any custom
information you choose. However accessing this value from your child window can
be a little tricky. In the WM_CREATE handler
for your child window, the lParam value for the WM_CREATE message will point to a CREATESTRUCT. the lpCreateParams member of that
structure will point to the MDICREATESTRUCT
you sent along with WM_MDICREATE. So in order
to access the lParam value from the Child window you need to do something like
this...
   case WM_CREATE:
   {
      CREATESTRUCT* pCreateStruct;
      MDICREATESTRUCT* pMDICreateStruct;

      pCreateStruct = (CREATESTRUCT*)lParam;
      pMDICreateStruct = (MDICREATESTRUCT*)pCreateStruct->lpCreateParams;

      /*
         pMDICreateStruct now points to the same MDICREATESTRUCT that you
         sent along with the WM_MDICREATE message and you can use it
         to access the lParam.
      */
   }
   break;
If you don't want to bother with those two extra
pointers you can access the lParam in one step with ((MDICREATESTRUCT*)((CREATESTRUCT*)lParam)->lpCreateParams)->lParam
I didn't use the lParam in my example to keep things simpler and instead used the title of the child window to store the filename.
Finally at the end of our Frame's window procedure we've made a change...
   default:
      return DefFrameProc(hwnd, g_hMDIClient, Message, wParam, lParam);
Instead of calling DefWindowProc() for unprocessed messages we call
DefFrameProc() which provides some specialised
functionality for MDI Frame windows.
Now comes the second window procedure, the one for our child windows...
LRESULT CALLBACK MDIChildWndProc(HWND hwnd, UINT Message, WPARAM wParam,
   LPARAM lParam)
{
   switch(Message)
   {
      // handle normal stuff...WM_CREATE etc...

      case WM_MDIACTIVATE:
      {
         HMENU hMenu, hFileMenu;
         UINT EnableFlag;

         hMenu = GetMenu(g_hMainWindow);
         if(hwnd == (HWND)lParam){      //being activated, enable the menus
            EnableFlag = MF_ENABLED;
         }
         else{                          //being de-activated, gray the menus
            EnableFlag = MF_GRAYED;
         }

         EnableMenuItem(hMenu, 1, MF_BYPOSITION | EnableFlag);
         EnableMenuItem(hMenu, 2, MF_BYPOSITION | EnableFlag);

         hFileMenu = GetSubMenu(hMenu, 0);
         EnableMenuItem(hFileMenu, CM_FILE_SAVE, MF_BYCOMMAND | EnableFlag);
         EnableMenuItem(hFileMenu, CM_FILE_SAVEAS, MF_BYCOMMAND | EnableFlag);

         DrawMenuBar(g_hMainWindow);
      }
      break;
      case WM_COMMAND:
         switch(LOWORD(wParam))
         {
            //handle various commands...
         }
      return 0;
   }
   return DefMDIChildProc(hwnd, Message, wParam, lParam);
}
The Child's window procedure has do do a few things
differently, most important is to call DefMDIChildProc() for any messages that you don't
handle. Also, in a change from the everyday, you always want to call it even for
messages you do process unless you have a reason not to, as it adds MDI specific
functionality to several messages.
WM_MDIACTIVATE is sent
when the user switches between child windows. It is sent to both the window
being activated and the one being deactivated (both of which are specified as
parameters). Menu handling in MDI is a little different than normal, since you
have several windows competing for the same menu bar and each one potentially
has a different set of menu-items available, or even a completely seperate menu
altogether. I've chosen to use a single menu and simply have each window enable
the items it uses when it is activated and disable them when it is deactivated.
Now of course in the example program there is only one type of Child window, so
most of the time the menu will be in only one state, but when the last window is
closed (or none have been opened yet) and there is no other window to enable the
menu, some of the items will remain grayed out, as they only apply when working
with a child window. In a program that handles multiple document types you might
choose to modify or even completely replace the menu for each child. SetMenu/GetMenu or WM_MDISETMENU can be used to accomplish this. WM_MDISETMENU can also be used to change under which
submenu the MDI children are listed.
You must keep in mind when dealing with MDI children that the menu and possibly statusbar or toolbar are shared between windows. Caution must be taken to avoid one window making changes which will cause another window to function improperly.
MDI features such as Tile and Cascade may be enabled by
sending a WM_MDITILE, or WM_MDICASCADE message to the MDI Client.
Please note... in the example, program termination is a
little inelegant. The program simply closes and takes all the child windows with
it. Ideally you would post a WM_CLOSE to each child window and allow it to query
the user whether of not to close, save, or cancel etc... If you want to
unconditionally detroy a child window, send WM_MDIDESTROY to the MDI Client and specify the
handle of the child you wish to remove. You SHOULD NOT use DestroyWindow() to destroy an MDI Child window.
Another note about the example... I haven't discussed the file loading etc, because it is essentially the same as the text edit program example above, with a few changes to better fit the needs of MDI. I use the window title of each child to store the filename, so the child knows which file to load or save. For new files I create the child with a title of "[Untitled]" and then the child checks for the initial '[' and if it is there doesn't try to load a file.
READ THIS
As with all common controls, you must call InitCommonControls() BEFORE you try and use them.
You will need to #include <commctrl.h>
in order to use this function and to get the functions and declarations
necessary for use of the Common Controls. You may also need to add comctl32.lib to your linker settings(do this if you
get "unresolved external" errors for the Common Control functions).
Download toolbar_one.zip
![[toolbar_one.gif]](toolbar_one.gif) You can create
a toolbar using
You can create
a toolbar using CreateToolbarEx() but I'm not
going to, so there. First thing you need to do is actually create the toolbar...
#define ID_TOOLBAR         4998

         g_hToolBar = CreateWindowEx(0, TOOLBARCLASSNAME, NULL,
            WS_CHILD | WS_VISIBLE, 0, 0, 0, 0,
            hwnd, (HMENU)ID_TOOLBAR, g_hInst, NULL);
That's simple enough, TOOLBARCLASSNAME is a constant defined by the common
control headers. hwnd is the parent window,
the one you want to put the toolbar in. In MDI Apps this is NOT the MDI Client,
it is your frame window. ID_TOOLBAR is an
identifier that you can use later to get the HWND of the toolbar using GetDlgItem(), if you so desire.
         // Send the TB_BUTTONSTRUCTSIZE message, which is required for
         // backward compatibility.
         SendMessage(g_hToolBar, TB_BUTTONSTRUCTSIZE, (WPARAM)sizeof(TBBUTTON), 0);
I dunno what's up with this but you need to do it
after you create a toolbar with CreateWindowEx(). Now we need to add some bitmaps to
the toolbar...
         TBADDBITMAP tbab;

         tbab.hInst = g_hInst;
         tbab.nID = IDB_TOOLBITMAP;
         SendMessage(g_hToolBar, TB_ADDBITMAP, 0, (LPARAM)&tbab);
g_hInst is of
course the applications instance handle(you knew that right?). IDB_TOOLBITMAP is the Resource ID of the bitmap to
add to the toolbar. You CANNOT use a string identifier here, I tried it and it
didn't work (which is strange if it uses standard resource loading functions, oh
well).
![[toolbuttons.gif]](toolbuttons.gif) A custom toolbar image
with 4 buttons.
A custom toolbar image
with 4 buttons.
This only associates a bitmap with the toolbar, we still
need to add the buttons and this is done with an array of TBBUTTON structs...
         TBBUTTON tbb[6];

         ZeroMemory(tbb, sizeof(tbb));
         tbb[0].iBitmap = 0;
         tbb[0].fsState = TBSTATE_ENABLED;
         tbb[0].fsStyle = TBSTYLE_BUTTON;
         tbb[0].idCommand = CM_RED_CIRCLE;

         tbb[1].fsStyle = TBSTYLE_SEP;

         tbb[2].iBitmap = 1;
         tbb[2].fsState = TBSTATE_ENABLED | TBSTATE_CHECKED;
         tbb[2].fsStyle = TBSTYLE_CHECKGROUP;
         tbb[2].idCommand = CM_GREEN_SQUARE;

         //...
The number of elements in the array is the number of
buttons you want to add, including seperators. I zero the array memory so I
don't need to set any values I don't need to NULL.
iBitmap specifies the
Index to the image you added with TB_ADDBITMAP.
fsState is the button
state. Here we've set it to be enabled, if we wanted it to be disabled, we could
leave this member as NULL.
idCommand is the
command ID, this is used like the ID of a menu item or button and is the id you
will check for in WM_COMMAND.
      case WM_COMMAND:
         switch(LOWORD(wParam))
         {
            case CM_RED_CIRCLE:
               MessageBox(hwnd,
                  "You clicked the Red Circle\n(as if you didn't already know)",
                  "Hi", MB_OK | MB_ICONINFORMATION);
            break;
fsStyle is the button
style, TBSTYLE_BUTTON is for a normal button
and TBSTYLE_CHECK is for a check button, one
that toggles on/off with each click. TBSTYLE_SEP can be used to insert a seperator, and
all of the other members can be NULL.
When you have set up all of the buttons in the array you send them to the toolbar...
SendMessage(g_hToolBar, TB_ADDBUTTONS, 6, (LPARAM)&tbb);
If all goes well you should now have a nice toolbar on
your window. To get it to resize when the size of your window changes (in WM_SIZE) you send a TB_AUTOSIZE message.
      case WM_SIZE:
         SendMessage(g_hToolBar, TB_AUTOSIZE, 0, 0);
      break;
To enable or disable buttons, you can use the TB_ENABLEBUTTON message...
   // Enable
   SendMessage(g_hToolBar, TB_ENABLEBUTTON, CM_RED_CIRCLE, MAKELONG(TRUE, 0));
   // Disable
   SendMessage(g_hToolBar, TB_ENABLEBUTTON, CM_RED_CIRCLE, MAKELONG(FALSE, 0));
CM_RED_CIRCLE is
the identifier of the COMMAND to disable, not the index of the button.
Messages usefull for check buttons (ones that toggle on
and off) are TB_CHECKBUTTON, and TB_ISBUTTONCHECKED.
There are a hundred other things you can do with toolbars but that's what the help files are for, get reading!
Download (see mdi_two.zip below)
Since many applications use the same set of commands (cut, copy, paste, etc...) it makes sense to not have to re-create the buttons each time. The common control library provides a set of standard buttons for use in any application. These can be accessed when adding a bitmap to the toolbar as follows... tbab.hInst = HINST_COMMCTRL;
tbab.nID = IDB_STD_SMALL_COLOR;
SendMessage(g_hToolBar, TB_ADDBITMAP, 0, (LPARAM)&tbab);
This, instead of loading a custom bitmap as we did
before, will load the standard set of images in small colour format. The indexes
needed to add the buttons to the toolbar are defined as STD_FILEOPEN, STD_COPY and so on (see your documentation for the
TBADDBITMAP struct). You add the actual button
to the toolbar the same way as before, specifying the appropriate index for the
bitmap.
         tbb[0].iBitmap = STD_FILENEW;
         tbb[0].fsState = TBSTATE_ENABLED;
         tbb[0].fsStyle = TBSTYLE_BUTTON;
         tbb[0].idCommand = CM_FILE_NEW;
Download (see mdi_two.zip below)
Considerably easier to use than toolbars. To create a status bar...#define ID_STATUSBAR 4997
g_hStatusBar = CreateWindowEx(0, STATUSCLASSNAME, NULL,
WS_CHILD | WS_VISIBLE | SBARS_SIZEGRIP, 0, 0, 0, 0,
hwnd, (HMENU)ID_STATUSBAR, g_hInst, NULL);
If you only want a single line of text in the status bar
that's all there is to it, you can use SetWindowText() to set it. If you want to divide the
bar up into smaller parts then you pass the SB_SETPARTS an array of int's specifiying the widths of each part, and the
number of elements to the array. The value of each element in the array is teh
number of pixels from the left side of the toolbar to the right side of the
part. For example an array containing, {100, 200} would make two equal parts,
one from 0 to 100 and one from 100 to 200. This is weird but that's the way it
is.
         int iStatusWidths[] = {200, 300, -1};
         SendMessage(g_hStatusBar, SB_SETPARTS, 3, (LPARAM)iStatusWidths);
I have specified -1 for the last part to indicate it
should take up all remaining space on the toolbar. wParam has a value of 3, the number of parts in the
array.
To set the text of the part individually you send the
SB_SETTEXT message. wParam specifies the index
of the part to which you want to set the text and lParam is the text itself.
         SendMessage(g_hStatusBar, SB_SETTEXT, 2,
            (LPARAM)"theForger's Toobar & Statusbar Example");
...would set the text of the 3rd part.
Like the toolbar the status bar will automatically
adjust it's width to match the window... it does this on receipt of a WM_SIZE message.
      case WM_SIZE:
         SendMessage(g_hStatusBar, WM_SIZE, 0, 0);
      break;
Download mdi_two.zip
![[images/mdi_two.gif]](mdi_two.gif) There's not
much to it, all you need to do is resize the MDI client to fit between the
toolbar and status bar, this can be accomplished with the following code.
There's not
much to it, all you need to do is resize the MDI client to fit between the
toolbar and status bar, this can be accomplished with the following code.
      case WM_SIZE:
      {
         RECT rectClient, rectStatus, rectTool;
         UINT uToolHeight, uStatusHeight, uClientAlreaHeight;

         SendMessage(g_hToolBar, TB_AUTOSIZE, 0, 0);
         SendMessage(g_hStatusBar, WM_SIZE, 0, 0);

         GetClientRect(hwnd, &rectClient);
         GetWindowRect(g_hStatusBar, &rectStatus);
         GetWindowRect(g_hToolBar, &rectTool);

         uToolHeight = rectTool.bottom - rectTool.top;
         uStatusHeight = rectStatus.bottom - rectStatus.top;
         uClientAlreaHeight = rectClient.bottom;

         MoveWindow(g_hMDIClient, 0, uToolHeight, rectClient.right,
            uClientAlreaHeight - uStatusHeight - uToolHeight, TRUE);
      }
      break;
In the example I've also added some code to the
WM_MDIACTIVATE handler of the child windows to
enable/disable the toolbar buttons as appropriate, and to set the current
filename to the first part of the status bar.
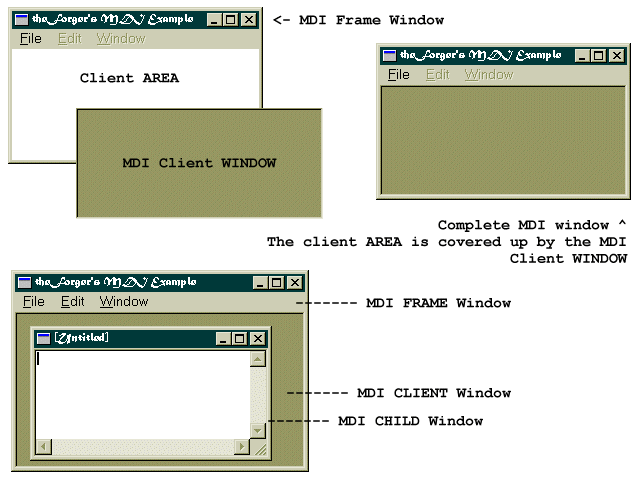